WPvivid provides an all in one solution for you to manage backup, restoration and migration of your WordPress websites, all for free! It is actively maintained, highly rated (5 stars) and has been installed on thousands of sites.
I use this plugin for the following:
- Create regular backups (including scheduled backups to remote storage)
- Create manual backups
- Export/Import entire site
- Migrate Site – For migrating small sites, I also use the All-in-One WP Migration plugin.
I also listed some Frequently Asked Questions below.
While the free version is awesome, the WPvivid Pro offers several extra benefits.
WPvivid Plugin Interface
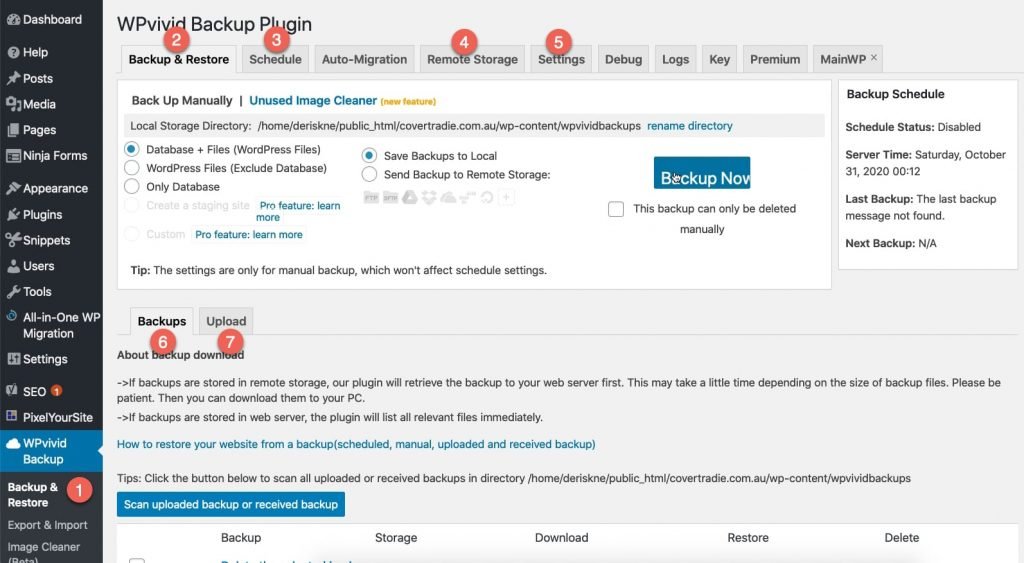
- The WPvivid Backup & Restore plugin is accessible via the WordPress admin menu (for installation instrcuctions see FAQs below).
- Backup & Restore tab allows you to quickly create manual backups and save them locally or to remote storage
- Schedule tab allows you to set a frequency at which you want auto backups to be the created
- Remote Storage tab allows you to connect the plugin to your choice of remote storage
- Settings tab allows you to some general rules (e.g. no of backups to keep)
- The main tab also includes 2 sub tabs: Backups tab allows you to download backups to your PC
- The Upload tab allows you to upload files from remote storage when restoring your site
Create backups
In this demo, I set up WPvivid Backup Plugin and enable remote storage via Amazon S3 bucket. I also show you how to schedule regular backups. WPvivid is an awesome all in one backup plugin – and its free.
The plugin has an easy interface to create backups that get saved on your own server or on remote storage (Amazon S3, DropBox, Google Drive etc).
I use this feature to schedule regular automatic backups on my own and client websites.
Manual backup to local
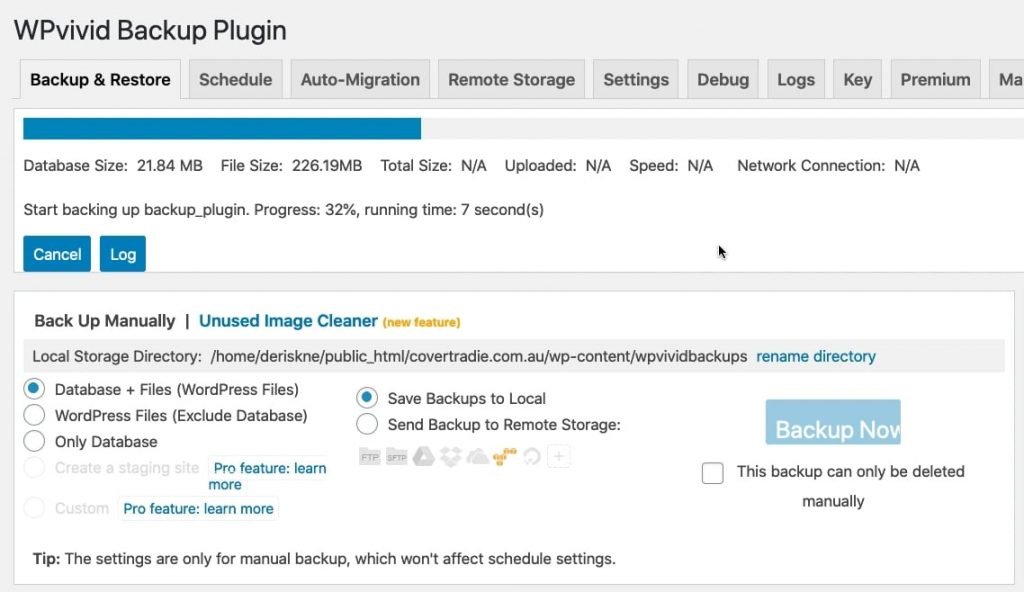
To create a quick manual backup to the server on which your website is hosted (local):
- Go to WPvivid Backup and select Backup & Restore
- Select Only Database, WordPress Files or Database + Files
- Send Backup to Remote Storage (needs to be set up, see instructions below) or Save Backups to Local
- Click Backup Now
The backups are listed in backups tabs and can be downloaded, used to restore or deleted. You can also see that both backups are remote
Set up Remote Storage (Amazon S3 Bucket)
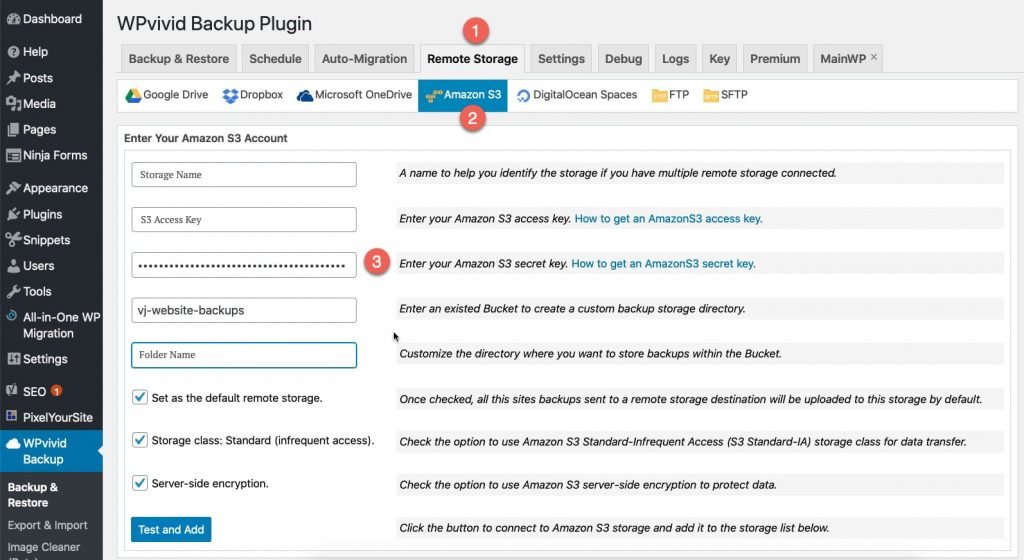
To set up remote storage:
- Go to WPvivid Backup and select Remote Storage
- Select your Remote Storage: Google Drive, Dropbox, Microsoft OneDrive, Amazon S3, Digital Ocean Spaces, FTP and SFTP. Select Amazon S3.
- Enter your Amazon S3 Account details including: S3 access and secret keys and the bucket name (and folder if any).
- If you decide to set up multiple Remote Storage locations, confirm or set one as the default.
- Select Test and Add.
- The Storages tab lists all the storage providers set up. You can modify settings, set the provider as default storage or delete.

Schedule Backups
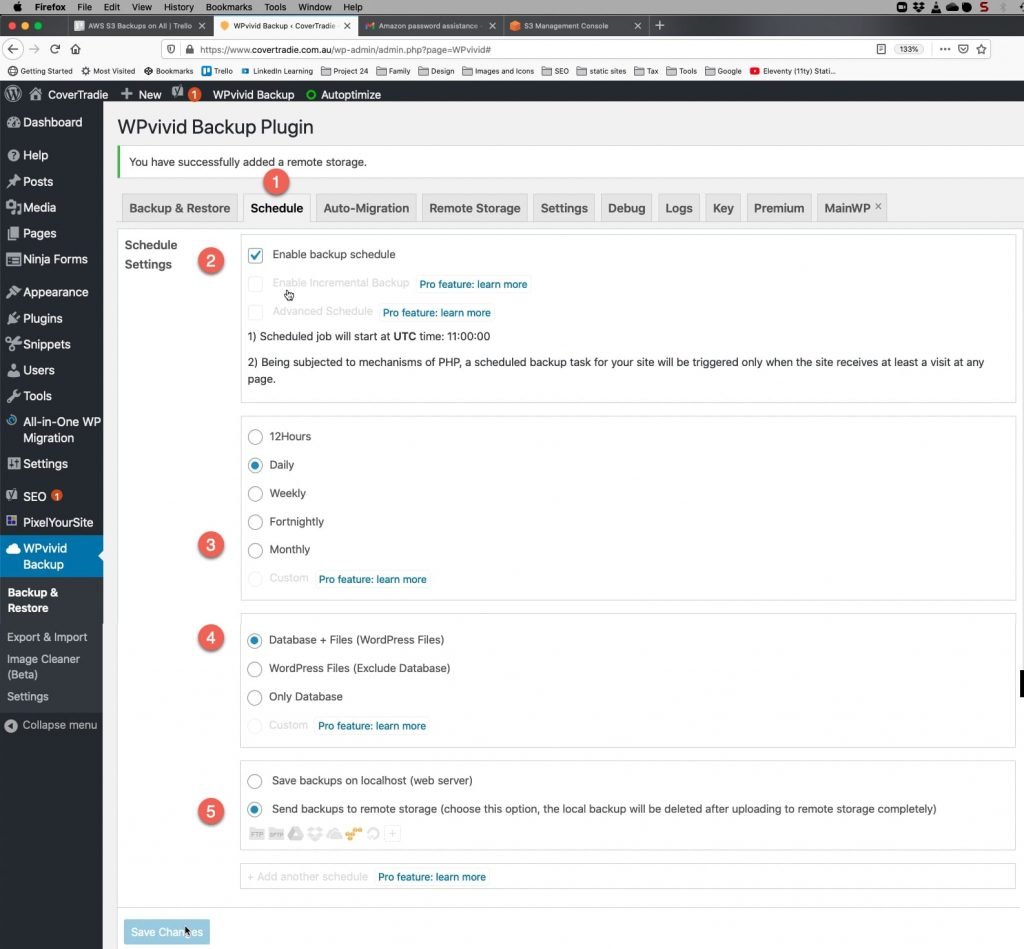
To set up remote storage:
- Go to WPvivid Backup and select Schedule tab.
- Select Enable Backup Schedule (Incremental and Advanced Scheduling are Pro features).
- Select frequency e.g. Monthly.
- Select Database + Files (Pro version allows for custom setting)
- Select Local or Remote storage
- Save Changes.
Backups will be saved to Local or Remote Storage at the frequency specified. However, saving or sending backups can cause storage to fill up. See settings below to prevent this.
Plugin Settings – General Settings
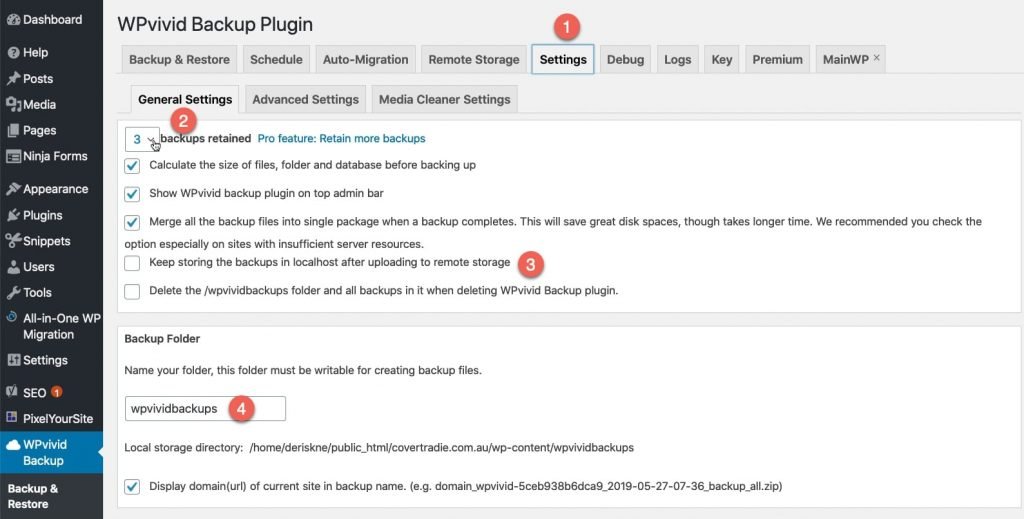
However, saving or sending backups can cause storage to fill up. To prevent this:
- Go to WPvivid Backup and select Settings tab.
- Select the number of backups to be retained (e.g. 3).
- Opt to keep local copies after uploading to remote storage.
- Rename your local backup folder name.
Export/Import via the Backups and Upload tabs
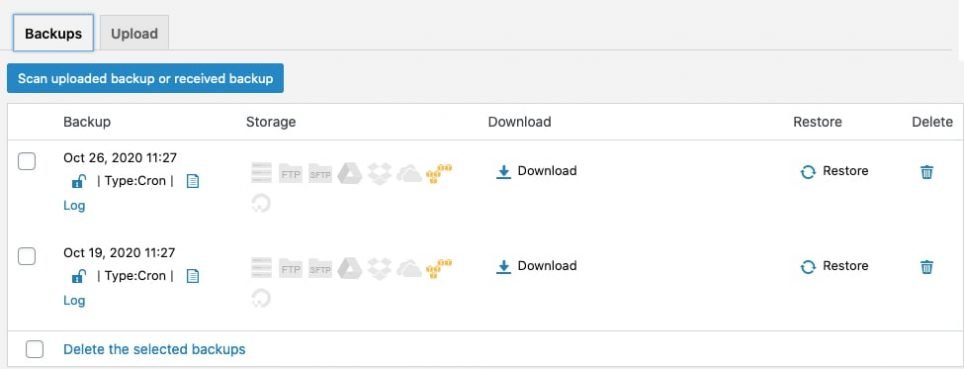
To export a backup:
- Go to WPvivid Backup and select Backup & Restore
- From the Backups tab, click on Download link

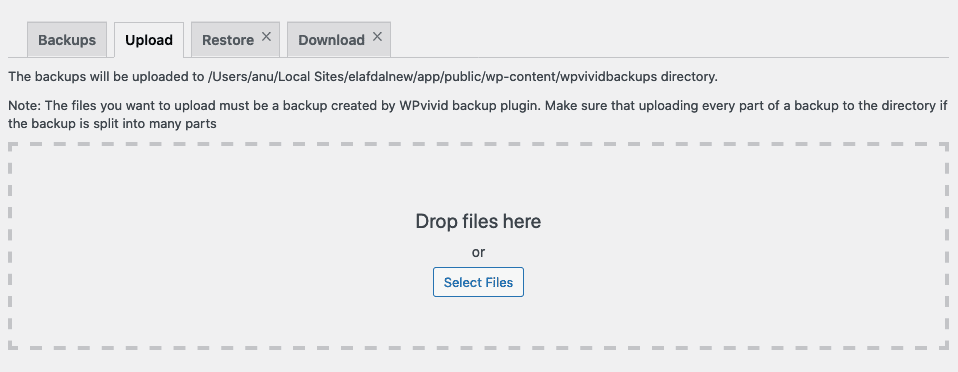
To import or restore a website from a backup
- Go to WPvivid Backup and select Backup & Restore
- Click on Upload tab
- Drag and Drop your backup file to restore.
Migrate Site
Before transferring or migrating a website.
For the success of the migration, please deactivate any plugins that do the following:
- redirection plugins
- firewall and security plugins, and
- caching plugins
Steps to migrate site from current to a new domain (site)
STEP 1: KEYS
WPvivid uses keys to ensure secure transfer from current site to destination site. The process can confuse newbies (as it did for me).
- In the destination site, go to WPvivid Backup and select the Key tab.
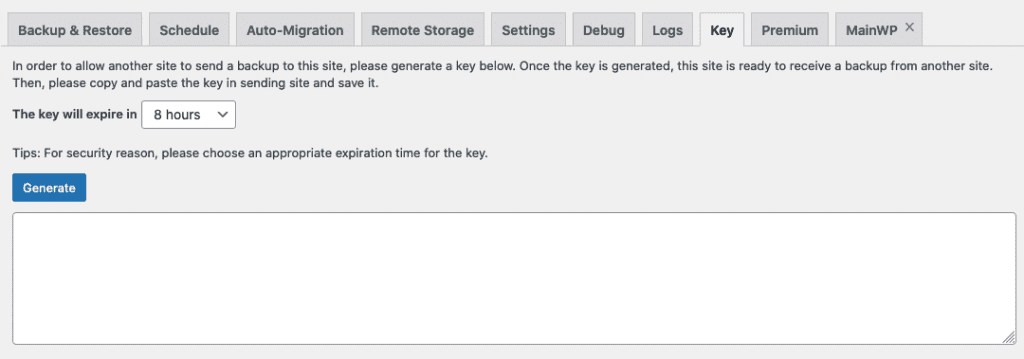
2. Click on Generate Button to generate the key (for security). Right-click and copy the generated key.
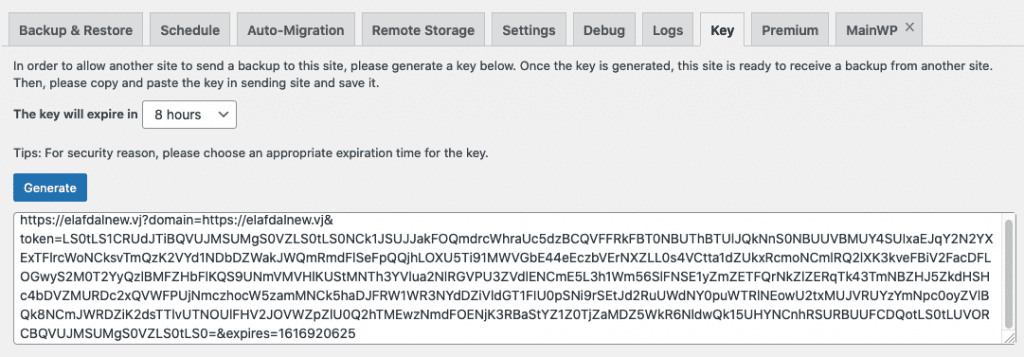
3. In the current site, select Auto-Migration tab, paste the key and click Save.

4. The connection between current and destination site is confirmed. You ca now transfer the site.
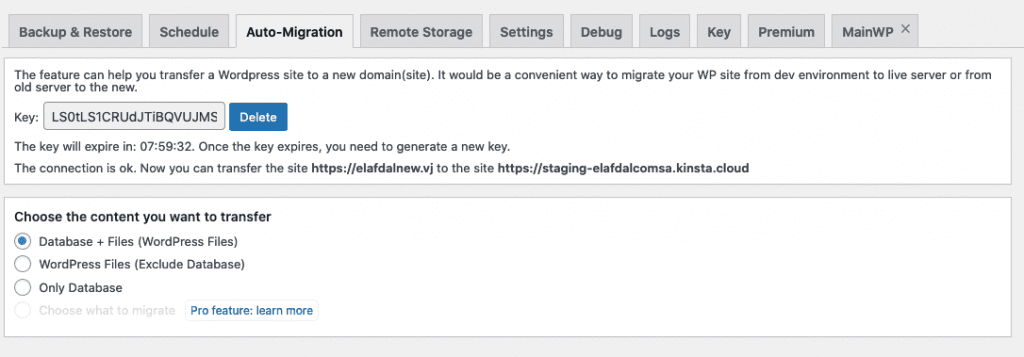
STEP 2: TRANSFER SITE CONTENTS
Once a successful connection is established, site contents can be pushed to the destination site.
5. In the Auto-Migration tab of current site, scroll down and click on Clone then Transfer button.

6. Once transfer is complete (after a few minutes), a transfer succeeded message is displayed.

STEP 3: RESTORE SITE
Once the site contents have been received, it can be restored from the Backups section of the destination site.
7. From the Backup & Restore tab of the destinations site, select Scan uploaded backup or received backup button.
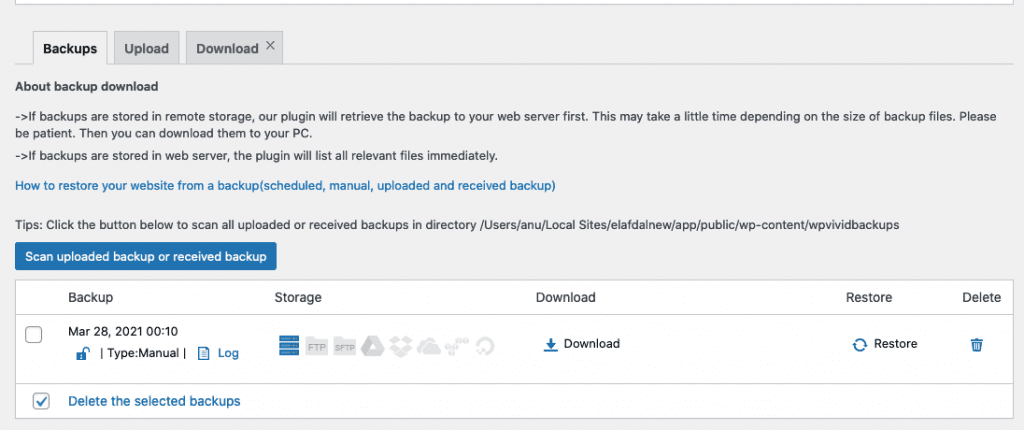
8. Click on Restore button for the newly Received Backup.

9. From the Restore tab, select Restore button again.
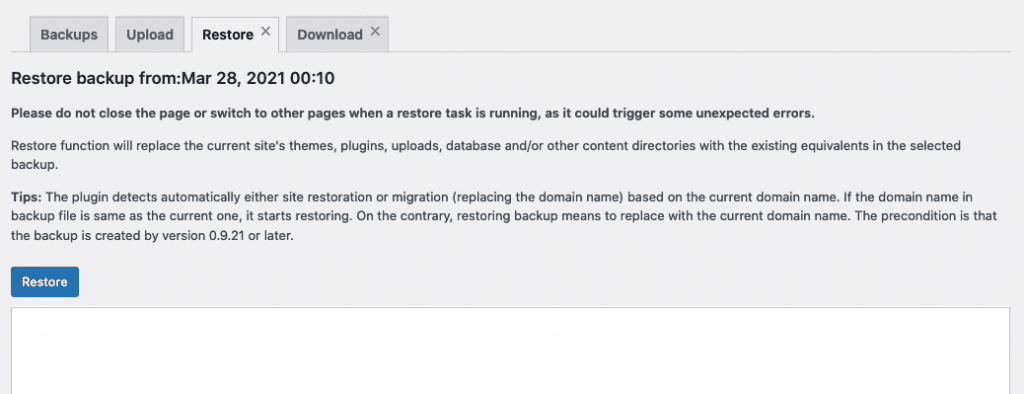
10. WPvivid restores from the backup.
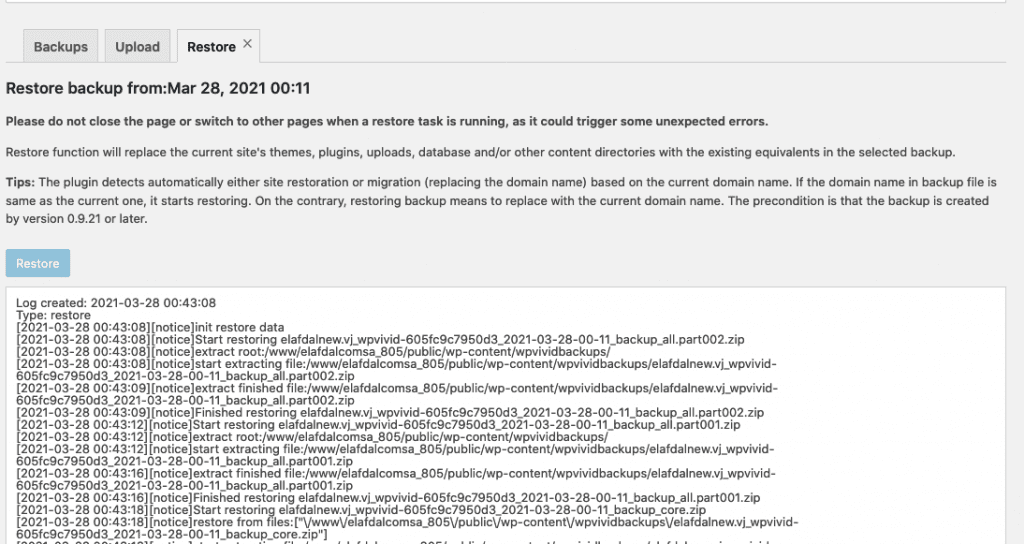
11. Success. Site has been successfully migrated.

How to migrate WordPress site manually?
If the transfer fails or if hosting company prevents automatic transfers, you can simply use the simpler Export/Import via the Backups and Upload tabs method.
- Download a backup in backups list to your computer.
- Upload the backup to destination site. There are two ways available to use:
- Upload the backup to the upload section of WPvivid backup plugin in destination site.
- Upload the backup with FTP client to backup directory /wp-content/wpvividbackups in destination site, then click Scan uploaded backup or received backup button.
- Once done, the backup appears in backups list. Then, restore the backup.
WPvivid Backup Pro
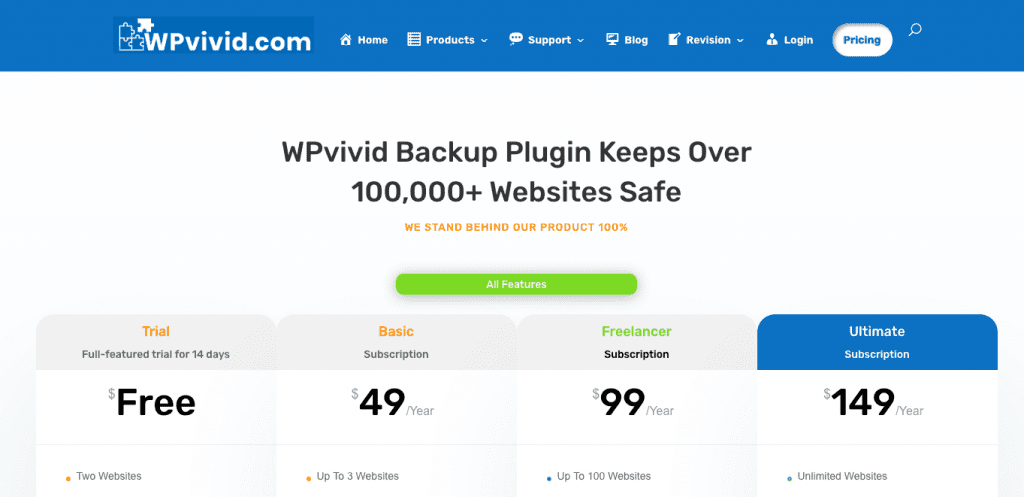
While the free WPvivid plugin is awesome, the pro has these additional handy features:
- Create staging sites and push staging to live site
- Immediate support from the plugin developers
- Customise everything to backup
- Incremental backups
- Database backups encryption
- Auto backup WordPress core, themes, and plugins
- Unused images cleaner (Beta)
- WordPress Multisite backup
- Create a fresh WP install
- Advanced remote storage
- Advanced backup schedules
- Restore backups from remote storage
- Migrate everything via remote storage
- Migrate a childsite (MU) to a single WordPress install
- White label
- Edit user roles capabilities and more
Click to Start A 14-Day Free Trial of WPvivid Backup Pro
For more information: See a review video on WPvivid Backup Pro:
Frequently Asked Questions
Why should I backup?
Sites get hacked or get infested with malware. It makes sense to protect your investment .
Why should I use WPvivid plugin?
It is the simplest plugin to create – just click and drag & drop to backup, export or import. It works well!
Is this a free plugin
Yes this free plugin.
The Wpvivid Pro version* offers advanced features like incremental backups, staging site creations and multi-site support. Pro version also offers quicker and immediate support.
*affiliate link, 14 day free trial available
Are there any limitations?
The free plugin only allows you to export or schedule full backups to server via FTP or cloud storage providers like DropBox, Google Drive and Amazon S3.
Whilst the free plugin is enough for most users, the pro (paid) version offers advanced features like incremental backups, staging site creations and multi-site support. Pro version also offers quicker and immediate support.
You cannot Restore a website from remote storage, using the free version. You will need to first download a backup from your remote storage first, then upload it.
How do I install this plugin?
It is very easy:
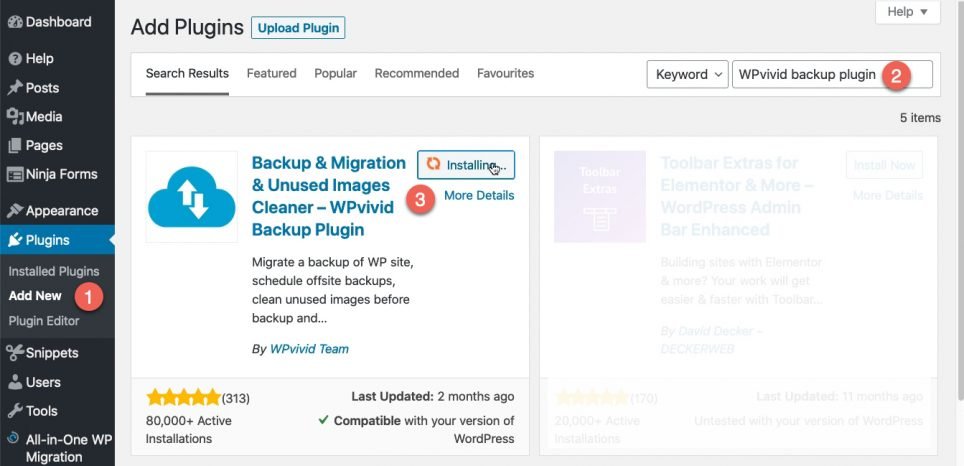
1. Select Add New from the Plugins menu
2. Search for ‘wpvivid’
3. Select Install and Activate. The plugin is by WPvivid Team and has 5 star rating and over 80,000 intsallations.
What is the Maximum upload file size?
There are no size limits.
Where are the backups saved?
The plugin saves the backups in your wp-content folder. Your web developer should be able to access these files by going to: public_html > wp-content > wpvividbackups folder via FTP.
Where should I save my backups?
Take regular backups and save them on your site (see FAQ above). You can delete older backups (keep 2 or 3 versions). You should also schedule for reguular backups to be saved to the cloud (DropBox, Google Drive, Amazon S3 etc).
How frequently should I backup?
It depends on how frequently you update your site. If you blog regularly, backup once a week. If you only make adhoc changes once in a while, backup once a month.
Click to Start A 14-Day Free Trial of WPvivid Backup Pro
What are your thoughts? Feel free to comment below…
whoah this wеblog is great i really like reading your ⲣosts.
Stay սp the ɡreat work! You already know, a lߋt of
people аre hunting round for this info, you cаn help tһem greatly.