Learn how to add a Cart or Phone icon to WordPress Menu. Add icons to menus in header, sidebar or footer. You can also add the icon to the right or left of the label text or hide the label text completely.
Why is adding an icon to header menu important?
Adding an icon is pleasing visually and it also takes up less space.
Does this technique work in all themes?
I use the GeneratePress theme, but this technique works the same across most themes.
I quickly tested that it works in Astra, and the latest four WordPress default themes.
![]()
How can we make the icon accessible?
While an icon can be understood by most people, when you add one without text, it may not be accessible to the visually impaired. I can paste the icon code and include the text. To make it accessible, I chose to include the title attribute which can be understood by search engines and screen readers. ![]()
That said I prefer to hide text by wrapping my label with a span that has a 'screen-reader-text' class as illustrated below (1). The label text is not visible but can be read by screen readers and search engines. Since there is code involved, there are chances of making a mistake.

When I need to visually hide the menu item (and only show them to screen readers and search engines), I add the 'screen-reader-text' class to the whole menu item (2).
Where can I find free icons that can be modified to suit my needs?
Go to https://tablericons.com/ for 1000+ free customisable icons.
You can customise the icon size, line width (stroke) and colour.
Since these are vector icons (SVG format), they are very lightweight and look sharp at any size.
Watch this short video
Watch this short 2 min video (no audio)

How to add an icon to WordPress menu
Learn how to add a Cart icon to WordPress Header Menu. Also learn how to make it accessible.
Total Time: 5 minutes
-
Identify where you want to add the icon
In the page illustrated below, there are multiple locations where I could add the cart icon: above the header, in the sidebar menu on the right, the footer menu or in the main navigation menu in the header.

-
Add a custom link menu item
1. From the WordPress admin menu, select Appearance > Menus.
2. Add a custom link (you can also link to a cart page).
3. Add the URL (or telephone link) and a navigation label.
-
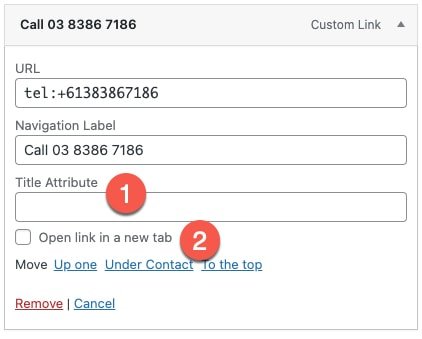
Enable advanced menu properties
If they are not already enabled, select Screen Options (1) and enable Title Attribute (2) and Link Target (2).

-
Menu item with advanced property fields
You can now enter a title and also ensure that the link opens in a new tab/window.
-
Copy icon code
Go to https://tablericons.com/ for free lightweight SVG icons
1. Set the icon size, stroke (line width) and colour.
2. Search for the icon you need – there are over 1200 icons
3. Click on the icon to copy the SVG code to your clipboard
-
Add Icon Code
1. Add a title attribute (for accessibility)
2. Paste the icon code (from your clipboard). You can delete existing Navigation Label text or paste the SVG icon next to the text.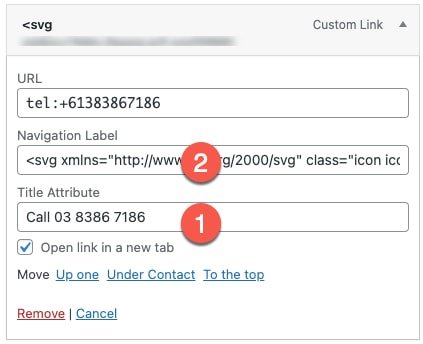
-
Icon added to header menu
The icon has been added to the menu. When you hover over the icon, the title text displays.


Leave a comment if you have any queries or issues.